不锈钢结构,具有较好的刚度和稳定性
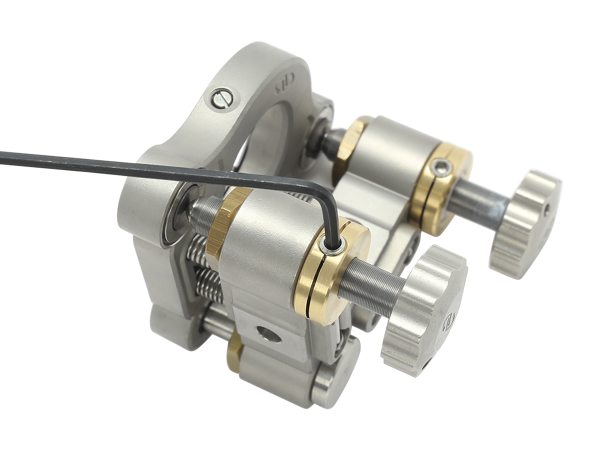
高灵敏度100或者254TPI旋钮调节螺钉
精密抛光的硬质合金垫
模块化可互换的致动器
经过时间考验且经过行业验证的设计

Classic Suprema是性能优良的模块化光学调整架,为要求比较苛刻的研究和工业应用设定了稳定性和可调节性的标准。Suprema调整架提供调节敏感的设置所必需的感觉和保持那个位置的稳定性。
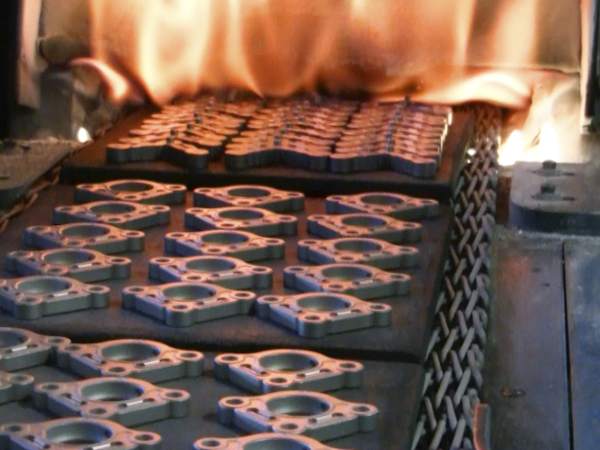
每个 Suprema 调整架作为制造过程的一部分进行热处理。热处理减轻了制造应力的累积,从而改善了调整架的整体稳定性。

1英寸(25.4毫米)和2英寸(50.8毫米)的Suprema反射镜调整架均带有10 µ英寸精密抛光的碳化钨运动垫,确保了稳定的运动机制。
Suprema反射镜调整架都是由不锈钢制成的,使其稳定、易对准。不锈钢的硬度是铝的3倍,因此弯曲明显变小,从而更易于对准。不锈钢的热膨胀系数低于铝,从而使其在温度波动期间稳定。 不锈钢使Suprema成为Newport反射镜调整架的旗舰产品。
Suprema SU100调整架设计允许轻松地拆卸和安装促动器。松开锁紧螺母可使促动器从调整架上轻轻滑出,从而可以针对特定应用进行重新配置。这个行业标准的9.5毫米孔径允许这些多功能反射镜调整架使用许多不同类型的促动器。 Suprema调整架不仅与标准促动器螺钉兼容,而且与千分尺、内六角调节器和差动千分尺兼容。
Suprema Classic低漂移反射镜调整架使用带有AJS衬套的挠性锁。 挠性锁对螺钉施加一个切向力以防止旋转。

The SU series mounts equipped our AJS 254-TPI adjustment screws are now avaiable. This ultra-fine adjuster provides alignment sensitivity as low as 1.5 arc sec, a 60% improvement over mounts having 100-TPI adjusters. Better adjustability means faster, easier alignment.
当您开始一个新实验室时,SU100和SN100C Suprema调整架可以节省成本的10套包装出售。 请参阅以下列表以获取可用选项:
SN100C-F2K-PK -具有2个执行器的开口版本 < li> SU100-F2K-PK -具有2个执行器的全光圈版本
SU100 -F3K-PK -具有3个执行器的全光圈版本
在 www.newport.com/packs 中查看所有的节省成本包装。
Purpose:
Newport's thermal drift testing of mirror mounts has two purposes: (1) to measure the deflection during a peak temperature shift (after a soaking period) and (2) to measure the shift in position after temperature cycling and return to initial temperature.
Method:
A mirror mount, with mirror installed, was securely fixed to a 1.5"-diameter solid steel pedestal post. This assembly was then placed inside of a climate-controlled environmental chamber and mounted to a stainless steel optical table. Upon fastening to the table, the mirror mount was set to nominal and zeroed to set the initial position. Throughout the test, an independently thermally isolated CONEX-LDS Autocollimator was used to monitor the reflected beam position. After initial alignment adjustments, the mirror mount was left to rest for two hours to allow the internal kinematic forces to reach equilibrium. Then, the mirror mount was subjected to a 10°C increase in temperature for one hour through convection heating. After a thermal soaking period to ensure the mount is sufficiently heated through, the mirror mount was returned to its original temperature, completing a cycle. This temperature cycling process was repeated 10 times over the duration of 62 hours, with deflection during peak temperature and shift after the end of each cycle recorded.
全不锈钢结构
The maximum deflection of the SU100-F2K mirror mount during peak temperature was 7 µrad in pitch and 17 µrad in yaw, and the shift in reflected beam position after temperature cycling was < 1 µrad in pitch and < 1 µrad in yaw. This demonstrates the mount's excellent thermal properties. Further details are shown in the accompanying graphs.
全不锈钢结构
The maximum deflection of the SU100-F3K mirror mount during peak temperature was 15 µrad in pitch and 10 µrad in yaw, and the shift in reflected beam position after temperature cycling was < 1 µrad in pitch and < 1 µrad in yaw. This demonstrates the mount's excellent thermal properties. Further details are shown in the accompanying graphs.
The maximum deflection of the SN100C-F2K-254 mirror mount during peak temperature was 36 µrad in pitch and 31 µrad in yaw, and the shift in reflected beam position after temperature cycling was < 1 µrad in pitch and < 1 µrad in yaw. This demonstrates the mount's excellent thermal properties. Further details are shown in the accompanying graphs.